
Resolution and Image Size in Photoshop CC
You want to become very familiar with working with your image size and resolution. In order to check on image size/ resolution you will go to Image > Image Size or use the shortcut of Cmd + Shift + I.
Resolution = the number of pixels packed into a linear inch or mm
When you get to Image Size it will show you the RAM it is taking up on the computer at the top (Image Size) and then it will give you your dimensions in pixels.
Underneath that it will give you the size that the image currently is and how my pixels / per inch. As you can see here this image is approximately 11 x 20 with 240 ppi. This is a decent resolution. Think about resolution as pixels per inch, or in the case of printers, as dots per inch. The resolution becomes the number of dots that the printer lays down. So, clearly, 72 dots per inch (dpi) is going to be less refined and believable of an image than one where the printer is putting down 240 dpi of ink.
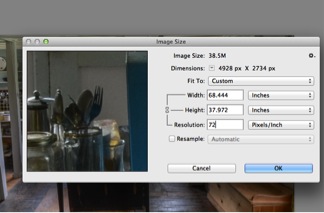
Now, you can see that the image is linked with width and height so they will be changed proportionally. You can also see that at this point, Resolution is unlinked. So, if you decide to make this image smaller the resolution will stay the same and photoshop will just get rid of (throw away) the extra pixels that were present. If you were to make this image larger or upsample, photoshop would guess about what those extra pixels would look like in order to maintain the 240 ppi. The process of guessing is called interpolating.

In this screen shot you can see that the resolution and the size of the image are all tied together. So, you are just moving around the SAME number of pixels. If you decide to make the image smaller there will be a higher density of pixels per inch. If you decide to make the image larger they will have to spread out over a greater area and thus will be fewer ppi. See the two samples below where this is made evident.

Making a canvas in photoshop.
You will need to learn how to make a canvas in photoshop with your images. You will go into photoshop and go to New > and then designate the width and height of your canvas (width will be either 24 or 44 inches and height will be determined by you). Make sure that the resolution that it is set to in this new document dialogue matches (exactly) the resolution of ALL of your images. If it doesn’t you will have images that are too large or small on your canvas. Once you have the canvas created you can select > all and Edit > copy (cmd A and cmd C and cmd V) and Edit > paste to put the file onto your canvas. Remember that if you are on an adjustment layer on top of the file and don’t flatten you will end up carrying over just the adjustment layer.
This image was taken under New and with height and width dictated by you. Notice the background color is white (which is what you want).

Lighten all images before printing on 7900 or 9900. See TA for assistance with this.
